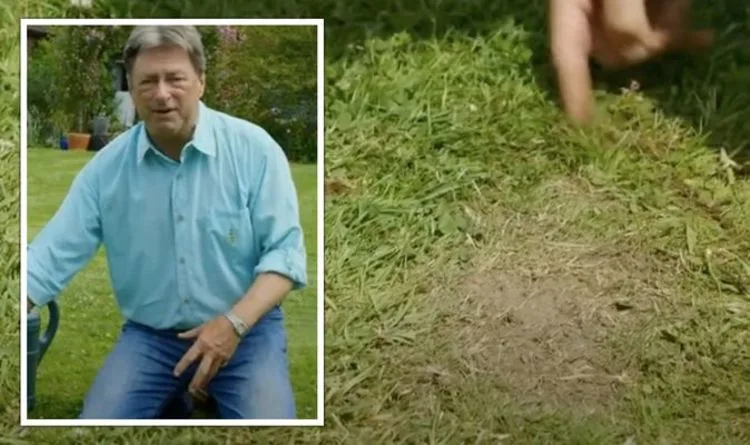
Gardening Expert's Simple Method to Fix Bare Lawn Patches Works Every Time
Gardening Expert's Simple Method to Fix Bare Lawn Patches

A gardening expert has claimed that a "hassle-free" method for tackling unsightly bare patches on lawns works "every time." For those striving for a picture-perfect lawn, bare patches can be an eyesore, but there is a straightforward technique that makes grass seed germinate "much more reliably."

The Expert's Approach

Richard, the face behind the Sheffield Made Gardens and Sheffield Made Plants channels on YouTube, recently shared what he described as the "exact way" to ensure grass "grows back in properly." Introducing a recent video on the topic, he said: "Have you got a bare patch in your lawn that just refuses to fill in? Well, there are a few simple tricks that make grass seed germinate much more reliably. I'll show you the exact way to do it so it actually grows back in properly. It's a hassle-free method that works for me every time."

He revealed that after installing a patio and greenhouse the previous winter, a bare patch of earth was left behind that "snakes around" and requires filling. Richard noted that the ideal time to sow grass seed is autumn, with spring being the second best option. He advised that the task can also be carried out in summer, though it demands "more effort" as seeds are prone to drying out more rapidly.

Wide Pickt banner — collaborative shopping lists app for Telegram, phone mockup with grocery list

Step 1: Remove Stones and Rake

Noting that he would use an all-purpose seed mix, Richard got stuck into the job. He pointed out he had already attempted to level the area in line with his patio, but the first task was to clear away large stones, fallen leaves, and weeds. Next, gently rake the surface to loosen the topsoil. Simply add more soil if the ground remains uneven; Richard advised against using compost, as it can "shrink down" and leave an "uneven finish."

Step 2: Sow Your Grass Seed

Once this is done, it is time to scatter the seed. Richard said: "Now, the trick here is to not go too heavy because cramming too much seed into one spot can actually work against you." He added: "The seedlings end up competing with each other and none of them do as well as they should." Richard also spread some seed into the existing grass to help the new growth blend in.

Step 3: Cover the Seed

Next came the "most important" step: covering the seed to shield it from birds and improve soil-to-seed contact. For this stage, Richard placed topsoil into a garden sieve. He recommended giving the problem area only a "light dusting" of around half a centimetre, noting that large clumps will only obstruct the seedlings.

Step 4: Water

A delicate watering follows next, a "nice soft spray," as Richard puts it. He cautioned against giving the soil a "blast" to prevent the seeds from being washed into one corner. Ensure it is "nicely damp" but not waterlogged. Richard added: "And then it's just a case of keeping an eye on it and waiting for germination. Now the biggest danger at this stage is the seed drying out. So if you can, water it at least twice a day in dry weather to keep that top layer nice and moist."

Patience Is Key

The first signs of growth should begin to emerge within roughly a week. When Richard revisited the patch three weeks on, it had transformed, with new growth visible throughout. He pointed out that it is perfectly normal for the lawn to appear slightly patchy for a couple of months, as it will become fuller once you start mowing. Richard cautioned us to "resist the temptation" to scatter additional seed, unless it continues to look sparse after a few months. To round things off, Richard stressed that the "most important thing" is patience and not letting the area dry out.

Pickt after-article banner — collaborative shopping lists app with family illustration